{Site currently under construction. Grace for my mess?}
Showing posts with label DIY. Show all posts

Saturday, October 22, 2011

Introducing Myra at MyBlessedLife.net - AND - A DaySpring Giveaway!

Update:  Giveaway has ended.  Congrats Karen Logan!  You won the DaySpring giveaway!  Enjoy your tote (my birthday is in January, so feel free to send it back to me. Just kidding, of course!)  Enjoy, Karen!)


It’s no secret around here that I love {in}courage and DaySpring from the bottom of my heart.  After all, it’s thanks to them that I’ll be in Pennsylvania in a few short days, soaking up all the learning and fellowship to be had at the Relevant ’11 Conference.  The most exciting part about all this, though, is the chance to hang out with some of my favorite bloggers, not the least of whom is my new friend Myra over at MyBlessedLife.net.


Doesn't she just look like someone you want to be BFF's with?  Wait 'til you check out her blog!

Myra is a wife, stay-at-home-mom and awesome blogger who offers her readers a plethora (yes, really… a real, actual plethora) of tasty recipes, frugal home décor suggestions, DIY ideas and tutorials, delicious giveaways, and the kind of real-life goodness we can all apply to our home, family, and faith.  I particularly enjoy her always-timely reminders on living faithfully and trusting God. 

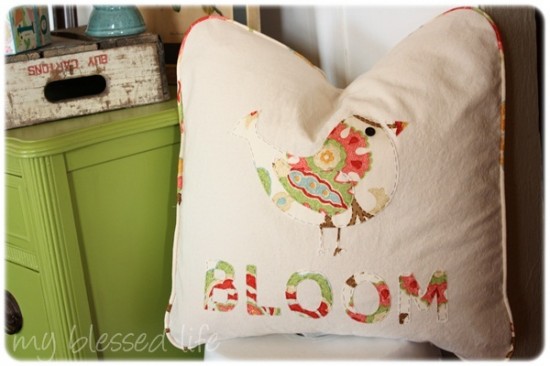
I love, love, LOVE her appliqued 'BLOOM' pillow.
White Chicken Chili?  Yes, please. 
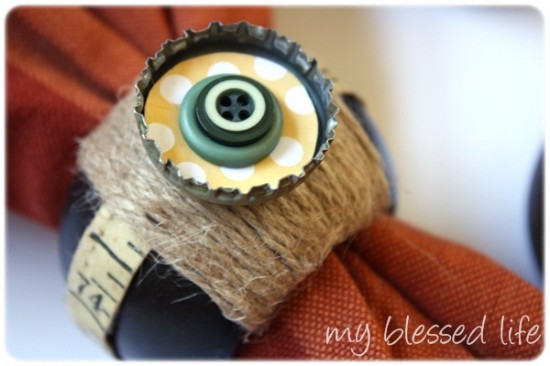
Tutorial for Myra's adorable and funky fall napkin rings.

I could go on and on, but I'll let you go check out MyBlessedLife.net now and marvel in the gifts splashing all over the bloggy pages at Myra’s place.  You can thank me later.  ;)

And for those of you who won't be able to attend Relevant, don't forget that {in}courage is bringing the beach house right to you this April, with {in}courage {in} real life, a world-wide {in}courage conference coming to your town.  Check it out, and register to attend.  I promise, it's the least expensive conference you've ever dreamed of attending.  Go see for yourself! 

-------------------------------------------------------------

As if that weren't enough excitement for one day, here's another little sumpin' sumpin' for you, today:  A DaySpring Giveaway!

But not just any DaySpring giveaway... a giveaway of a particular little lovely that I picked out just for you, a 'Just Trust God' jute tote bag, featuring Psalm 25:5.  


Isn't it cute?!  Too bad I can't win a giveaway on my own blog, or I'd enter like a jazillion times.  Luckily for you, then, it's up for grabs for one lucky reader.  

Speaking of entering... here's how:  Do any of the below items, and post a comment to let me know.  Please post a separate comment for each item, in order to get the most entries to win the tote. 

-  Become a new subscriber of WhimsySmitten, right here
-  Become a new follower of WhimsySmitten on Twitter: http://twitter.com/WhimsySmitten
-  Visit Myra's site:  MyBlessedLife.net, and comment here, telling me your favorite recipe, craft, or DIY project on her site. 
-  Subscribe to MyBlessedLife.net, or comment letting me know that you already subscribe. 
-  Register to attend {IN}RL (that's {in}courage {in} real life) in your area this April, then comment here to tell me you did (It's only $10!!).  
-  Follow @DaySpringCards or @incourage on twitter

With that many ways to enter, you have no excuse!  Entries will be closed and winner will be announced here on this blog on Monday, October 31, so hurry!  There's not much time!  GIVEAWAY HAS ENDED. 

  • Size: 18"L x 14"H x 6"D
  • Made from 100% jute
  • Lining: 100% cotton in coordinating color
  • Sturdy handles with 12" drop
  • Message and design on one side only

Tuesday, June 29, 2010

Four Hour Thrifty Beachy Bedroom Makeover

Redecorate? Why, of course!

I may have already mentioned what an *insanely* busy week I have -- one without a single spare second for playing around with DIY projects, redecorating, or blogging about those things. Yet, here I sit, about to share the fabulous (if I do say so myself) beachy bedroom makeover I just pulled off in my daughter's bedroom yesterday. She's at grandma's during church summer camp (grandma lives closer than we do), and though I have SO much more I should be doing... why not redecorate something instead?

It is inevitably times when I really don't have the time to spare that I take on projects like this. It drives my husband absolutely up. the. wall. His very logical mind doesn't understand why prioritizing my tasks is so difficult for me. The simple answer is that I really hate housework and would so much rather be doing something I enjoy. Sad, but true.

Anyway, as embarrassed as I should be to share this photo with the world, this is exactly how my daughter left her bedroom:

Photobucket

Terrible... huh?


And this is how it looks now:

Photobucket

Photobucket

Not bad for 4 hours, eh?

We're having loads of houseguests coming through over the next few days to celebrate My Girl's 7th birthday, and this room also serves as a guest room (she has a bed up in the loft, too, where all the toys are supposed to be, which is where she sleeps when we have guests and, in the summer, whenever the urge strikes). Anyway, she's in love with mermaids and horses and princesses, all things girly and all things tomboy-ish, and is as organizationally challenged as the rest of her family, I'm afraid. If she had her way, she'd have a Little Mermaid bedroom with horses everywhere and Disney Princess decals on the wall... all of which makes my decorating OCD twitch and lurch, especially in a sometimes-guest room. It probably makes me a terrible mother that I just can't give my little girl whatever kind of bedroom she wants (and in my defense, she had a Disney Princess bedroom once-upon-a-time), but I just can't stand the commercial-cartoon bedroom theme, even for a seven-year-old.

The solution she and I came to was a beachy-cottage look bedroom. We live on a ranch in the mountains, and her bedroom branches off a traditional log-cabin lodge (with moose heads on the wall and everything) so it may look a tad out of place, but this is like a grownup mermaid bedroom... something she won't argue with, and the horses and fairies and Disney paraphernalia can be stashed up in the toy loft plastic disaster room, keeping the sometimes-guest-room free of toys and clutter, so that she can sleep, read, do homework, and relax in her room.

Part of the challenge of living here has been that we're only caretakers for the place and the house doesn't really belong to us. Our decorating options are limited, and I'm not able to be rid of the green shag carpeting, harvest gold lineoleum/sinks, or, horror of horrors... wood paneling. Gah. I sooo would love to paint the paneling white in this room, but for now I just have to do my best to draw attention away from the oh-so-retro look. I do love the wood floors in there, though.

Anyway, this is what I did in the room...

I switched out the black dresser for a junk-store makeover that was in my studio. My sister-in-law found this great piece buried in the back of a junk shop for $30 and it's been something we're working on together for her first place. She'll take it to college with her in the fall, but we're putting it to good use until then, since she doesn't have anywhere to store it. It was dark wood with white drawers, and all we've done so far is spray paint the outside, leaving the drawers in their previous weathered shape. The shutters are from ReStore and were stashed in the guest house, so I pulled 'em in to add some more white to the dark room.

Photobucket

This was another ReStore purchase (for $5!). A window frame with shutters that open.

Photobucket

Photobucket

I thought I'd love an aqua fabric behind this, but wasn't in love when it was done -- the color was just too bright for the muted peaceful look I was going for. For take two, I stapled burlap to the back... much better. I then dry-brushed a plain wood board and adhered it with mounting tape to create a ledge, hung a mirror and some framed sea-grass photo-look scrapbook paper. I got the glass jars in a pack of 3 at the dollar store, so I filled them with decorator sand and attached scrapbooking stickers to spell out s-e-a.

Photobucket

Photobucket

Love it! I especially like how much of the wall it covers -- hides more of the ugly wood paneling.

For the bed, I just flipped over her existing comforter so the white side was showing, instead of the quilted pastels on the other side. The throw pillows were laying around in various other rooms of the house, and the beige one is an unused couch cushion. The "throw" at the bottom of the bed is really just 2 yards of scrap fabric I found at GW for $1.

Photobucket

The serving tray had a big crack in the wood bottom, and it's been waiting for inspiration. In my "photo real" stack of scrapbooking paper, there was a sheet that looked like sand, so I cut the paper to size and put it in the bottom of the tray, sprinkling it with seashells ($1 for a basketfull at the Dollar Tree), and a sand-filled mason jar votive holder. Whatdya think?

Behind the bed, I hung a shelf (a cheap Ikea shelf I had stashed away), and filled a double frame with, what else, photo-look scrapbook paper of an ocean horizon, then added some candles and shelves for a little wall display in-lieu of a headboard. (There was a headboard in here before that I just took out instead of doing something with it. It would be cute painted, but that piece was already here and not mine to re-vamp, so we opted for re-housing it in the garage instead).

Photobucket

I left the white lacey curtains in the room, but cut some leftover burlap and hung it from the curtain rods for makeshift valances.

Photobucket

The rest of the wall decor was whipped up during the project (all part of that 4 hour time frame), with some craft paint and hot glue, in true Whimsy Smitten style. The desk in the corner will be replaced shortly with one I'm working on repainting, and we'll be adding a little vanity I'm re-doing for her as a birthday present (sshhh!).

Photobucket

Voila~!

Photobucket

Now I want to move into this room! I love the peaceful colors, and these windows get a great breeze through the room, which can really fool you into thinking you're relaxing in some beach cottage on the coast.... if you ignore the sound of the cows and goats outside, that is.

Even though I SO didn't have time for it, it was totally worth the four-hour diversion to pull this off. What do you think?

Linking to these parties:

  All Thingz Related  

Monday, June 21, 2010

Crib-turned-Reading Bench Makeover

Now that my third baby, Lil' C, has turned two, I'm discovering the bittersweetness that comes along with de-baby-fying the house, slowly but surely. Since we're relatively sure that he'll be our last baby (at least for the forseeable future), we have no need to hold on to any of these items, but the sentimental downright mushy side of me hates to part with the last little nostalgias of baby-hood.

I had a yard sale last week where I parted with the highchair, jogging stroller, baby toys, and lots of other things, but a few pieces remain. One of those things was a mini-crib we bought for our bedroom, where Lil' C spent his first year sleeping, since sharing a room with either of his siblings when he was that young just wasn't working out. I bought the thing mainly because it's an identical match to the standard-size crib he has, and both pieces convert to bed frames -- the regular one a full size, and the mini one a twin size. I was jazzed to finally use it for this purpose until I priced out the rail conversion kit to make the change and discovered that the rails alone were a hundred bucks plus shipping. Since I picked up two awesome sets of industrial-looking bunk beds last week for $30 a piece (score!), I don't really need the twin bed option anymore anyway.

With some time and ingenuity, I know I could figure out a way to DIY the bed rails, (and I still might, if I have the need), but as per usual, I opted for a quicker lazier way to re-use the piece for the time being. Since I'm all a-flutter about the hot weather and an opportunity to create an outdoor living space, I thought I'd turn the mini-crib into an outdoor reading bench/comfy lounge spot on the patio for the kids.

Apologies, as usual, for the poor photo quality... impatience and operator cluelessness is to blame.

Before:


I took the front panel and round rail off the front, which was perfectly constructed for this since the hardware for the bed base/seat actually attached to the front legs of the crib. Since I plan to use this outside, I coated it with a coat of Thompson's deck sealer, which may or may not have actually done anything since the surface was not very porous. I don't much mind if the thing gets a little weathered, though, so take that for what its worth. Again, impatience and laziness win out over preparation and forward thinking. :)

There's a funky shadow in the picture (and Suzy, the headless bulldog -- AAHH!), but its really just the crib without a front...

I raised the bed base up from its previous position at the lowest setting up to chair-height and fixed some of the nicks and scratches in the wood by filling them in with a Sharpie.

The mattress pad that came with the thing was pretty chintzy and worn out, so I topped it with some foam pieces laying around from who-knows-what and used a serrated knife to cut the foam to size.

Here's Lil' C demonstrating the bed's former use)

To help keep the foam pieces from getting ruined, I made a quick cushion cover out of a cute vinyl tablecloth I found at Goodwill awhile back. Since I recently decorated my dining room in a French country/rooster theme and the dining room looks out onto the patio where this will sit, I thought this would work perfectly, and not bad for something like fifty cents. The vinyl enclosure will keep any wet weather from ruining the padding (in theory). Of course, if you were doing this project to make an indoor bench, you could opt for any fabric that suits you.

Tablecloth and Foam piece
I then used an extremely high-tech and delicate method for covering the foam with the tablecloth: Packing tape!


I know... lazy. But in my defense, vinyl tablecloths are a dime a dozen and I may opt to switch it out for another one at some point (and I'd still like to be able to use the rooster tablecloth if I do), so this is a non-permanent slipcover. I just folded the foam up like I was wrapping a gift...


...taped the excess down to the bottom, flipped it over, found a cute little model to try the bench out, and... voila!


Now that I look at it, I bet it would look cuter if I added the little mini-crib dust ruffle that I used with the crib set (which happens to be blue and white gingham), beneath the foam bench. I'll have to see if I can find that anywhere. When I put the bench out on the patio, I stuck an under-the-bed plastic bin with a snap-on-lid beneath it, where I can stash the throw pillows and store kid books for the perfect little porch reading nook.

The kids seem to be enjoying it -- at least one of them has been on the bench perpetually since I finished it this morning, and it's now 6 p.m. here. You can't beat anything that inspires the kids to kick back with a good book, right?

Hope everyone had a great weekend and enjoyed my Monday Makeover!

Linking to: The Girl Creative The DIY Show Off
Making BWS tips button Sumo Sweet Stuff

Sunday, June 6, 2010

Wall Hanging for a Buck

The first promise I make and I already break it -- go figure. Forgive me for not sharing sooner. Come have a seat on the patio with me. This is one of my favorite spots.


Anyway, as it often does, life happened, and while I had intended to get right to work creating something fabulous to kick off my blog blabber, that just didn't quite happen. While I do have bigger and better projects I hope to get to soon, we just found out the house we're living in is being put on the market, which means some serious cleaning and home staging has taken priority, at least for this week.

I do have some photos to share, but accept my apologies for their quality. I recently got a new camera that is turning out to be terrible, and I need to mess with some settings and see if I can figure out how to improve things, as its guaranteed to be operator error.

Here's something I whipped up on the cheap with just a few minutes and the help of the Cricut.

Before: Plain dollar-store plaque.

I painted it with gesso and then dry-brushed on some aqua craft paint (I cheated and didn't even take the ribbon that came with it off first -- that's lazy!).


Cut some vinyl in the font I chose (using Make The Cut software, along with the Cricut)


And transferred the image to the plaque using clear contact paper as transfer tape. It needed a little something, so I added the bird graphic with a rubber stamp... and... voila! Cute little wall hanging in a jiffy, and for barely more than a buck.

Hope it's been a beautiful weekend for you all, and welcome to my new visitors. Thanks for stopping by!

Edit: I was SO excited to discover that this week's CSI challenge was a dollar-store theme. I really wanted to participate in the Martha Stewart challenge last week but once again, life got ahead of me, so without further ado, I'm linking up to my first official link exchange and entering into my first challenge with this super-thrifty lil' darling. Check out the CSI Project page and enter your own dollar-store treasure!

Visit thecsiproject.com

Have fun and Get Smitten!